
Products You May Like
Few things ruins a good impression faster than a creased shirt. Bad breath, maybe. A limp handshake. Remnants of the morning’s breakfast hiding in your beard . That’s the scale we’re talking about. And once you’re out and about in the world wearing your unironed eyesore, there’s nothing you can do to hide it.
Shirts are an ever-present in any man’s wardrobe – you need them for work, play and every dress code that doesn’t involve swim shorts. So a proper ironing routine is the only way to do them justice. Because if you don’t iron your work shirts, for example, you might as well be wearing the onesie you sweated your hangover into on Sunday. No matter how good the rest of your outfit is, if your shirt is a crumpled mess, the impression you give is exactly the same.
That said, ironing isn’t quite as easy as your mum made it look. It’s a practice-makes-perfect kind of thing, and there’s a lot to consider if you want to do the job properly (and get it done in under 45 minutes). So here’s how to iron a shirt like a pro, to save yourself time, money and embarrassment.
Buying An Iron
Not as simple a task as it sounds – there’s a lot to look for when buying an iron. It all depends on what materials you’ll be ironing, how often you’ll be using it, and how big your ironing pile is.
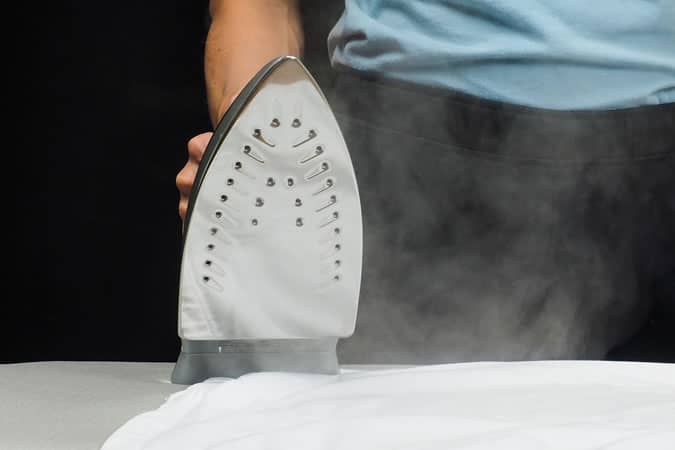
Steam irons are the most popular type of iron. They apply steam onto a garment when ironing, to moisten and relax the fabric fibres, making it easier for the iron to remove any creases. As a general rule, better irons will have a higher steam output.
You’ll need an iron with a well built soleplate – which, in layman’s terms, is the iron’s face. Just to make things a little confusing, though, there are five different types of faces. First, there’s aluminium faces, which heat up well but can scratch quite easily. Then there’s non-stick, palladium or stainless steel, which will all glide across your clothes more smoothly. The last is ceramic, which glides and distributes heat well, and is quite hard-wearing.
It’s advisable to go for a middle-of-the-market iron, because the price tag doesn’t necessarily reflect quality beyond a certain point. It’s also best to go against the grain and get out into the real world when you buy your iron, rather than purchasing it online. By all means do your research online, first – but you’ll need to make sure the iron fits well in your hand and that you’re happy with its weight, as well as get a good idea of how easy and accessible its controls are.
And, the partner in crime for every iron – you’ll need to invest in a good, solid, well-padded ironing board.
Using The Iron
Before it even gets to the ironing stage, be sure to use fabric conditioner when you wash your shirt, because this will make it easier to iron and improve its overall appearance.
Your iron will come with different settings for different kinds of material. And there’s little doubt the shirts in your wardrobe will need different settings.
How To Iron A Shirt: Step-By-Step Guide
Pulling out the ironing board can be intimidating, but follow these steps and you’ll have a wrinkle-free dress shirt in no time.
Step 1: Read Shirt Label
The first thing you can do is check the care label on your shirt for instructions. But, as a general rule, first sort your shirts into linen, cotton and synthetics. You’ll be able to see the material your shirt is made of by looking at the label. This way – you can gradually dial up the settings in the order of what materials require more heat, without having to wait for the iron to cool down in between.

Step 2: The Ironing Set Up
Once you’re ready to start dispelling wrinkles, pull out your ironing board (or find a suitable flat surface) and plug in your iron. Be sure the iron has water in it and that you set up close a power outlet and a place you can hang your freshly ironed shirts.
Step 3: Wet Your Shirt
Using a spray bottle, mister or the spray function of the iron, spray the shirt liberally. Quite how liberally depends on how soon you want to wear the shirt after ironing it – but the damper it is, the easier it’ll be to iron the creases out.
Step 4: Shirt Prep
Undo all the buttons, including the cuffs, lay all your shirt flat on the ironing board and then follow this all-important order to iron the shirt quickly and thoroughly.
Step 5: Time to Iron
When it finally comes time to start ironing, the trick is to always keep the iron moving so you don’t burn anything – while ironing out creases and avoiding adding any new ones in. Lightly pull on the shirt as you go, but not so much that you create creases. This really comes with practice.
But follow this order and you’ll be well on your way to a freshly pressed shirt in no time.
The Collar: Open it flat and remember to iron both sides, starting from the outside and working inwards. Fold over, pinch the fold and run the iron over one more time to keep it crisp.
The Cuffs: Like the collar, open it out and iron the inside first to remove any creases or folds. Again, work from the outside in
The Yoke: This is the top of the back and shoulder section. Starting from one side, work into the middle, then turn the shirt around on the board and do the other side
The Back: Now do the rest of the back, dampening the shirt for any stubborn creases
The Front: Iron the placket (where the buttons and button holes sit) first, pinching and pulling the end to make the job easier. Use the pointy end of the iron to get between the buttons. Then iron the rest of the front
The Sleeves: Making sure the fold is at the seam, iron both sides of the sleeve, pulling gently from one end to make sure they’re taut and crisp
Step 6: Hang & Admire
The last, but certainly not least important, step is making sure to hang your shirt up straight away afterwards. This is especially crucial if you got a bit steam-happy and the shirt is still damp. Be sure to admire your handiwork and ensure you haven’t missed any pesky spots.
How to Iron a Shirt by Fabric Type
If you’re nervous about ironing a specific type of shirt, here are different fabric types you may come across, and the best way to tackle their wrinkles.
How To Iron Cotton Shirts
For cotton shirts, iron your shirt slightly damp on the side you’re ironing, with a hot iron. Iron lengthwise, not in circular motions, to avoid damaging the material.
How To Iron Cotton-Blend Shirts
Use a low heat for cotton-blend shirts, with steam. Either iron it inside-out or place a thin cloth between the shirt and the iron to prevent scorch marks.
How To Iron Polyester Shirts
Definitely use a handkerchief or something similar to avoid any iron-to-shirt contact here, because polyester is an extremely heat-sensitive material. If you’re reading this, Peter Stringfellow, the same goes for your silk and satin numbers.
How To Iron Linen Shirts
Make sure to iron these shirts inside out, especially if they’re a darker colour, to avoid a shine caused by the heat.
Ironing Tips & Tricks
1. For a military finish, use a starch spray to get a crisp, clean finish to your shirt. They’re easy to find in the supermarket, and will come with how-to-use instructions.
2. If you find the pointy end of the ironing board awkward, spin it around and use the squared-off edge at the other side. This will allow you to iron more material in one go without moving the shirt around.
3. Iron your shirt inside-out whenever possible. It’s a bit of extra effort, but it’ll pay off for all the times you manage to avoid ruining your clothes with a big iron mark. Never a good look.
4. Avoid ironing shirts’ buttons, zips or any other hard material.